vgthought.com
Super Mario World: Castle 2 Analysis
Posted: 2014-02-03 03:07:29
Last edited: 2014-02-27 19:32:59
Last edited: 2014-02-27 19:32:59
This was originally posted on June 24th, 2010 under the name "Fatalism, Mario Style."
Here, my aim was to look at each jump of Morton's castle, which is the end of the second world in Super Mario World. The first room is paced at the game's whim (it acts independent of the player), and the second room showcases persistent enemies. These two ideas are presented in the context of upward platforming. The third room of the stage finds different ways of expressing these ideas (that is, it uses different assets that achieve the same goal) and intensifies the verticality.
This is one of my more rigorous essays, as I wanted to take no stage element for granted. I find that the finer detail here results in a greater understanding of rhythm and progression. That said, it runs out of steam right at the end, just after the last image. Additionally, it does not examine all aspects of enemy behavior (for instance, why does the ball 'n chain swing in circles? what is the importance of its two-block-long radius? why are they in the ceiling instead of the floor?). Instead, this essay limits itself to those aspects which it finds relevant.
Games discussed:
Super Mario World
In Super Mario World, the player influences many things aside from Mario. Though the player directly controls Mario, he/she also has indirect and partial control over objects and enemies through Mario. Sometimes this can be as simple as killing an enemy by jumping on it, and other times itĺs more complex. For example, in Yoshiĺs Island 3, certain platforms sway under Marioĺs weight.
Castles and fortresses in Super Mario World intimidate the player by restricting how much influence the player holds over Marioĺs environment. I'd like to discuss Morton's castle, the last level of the second area, in specific.
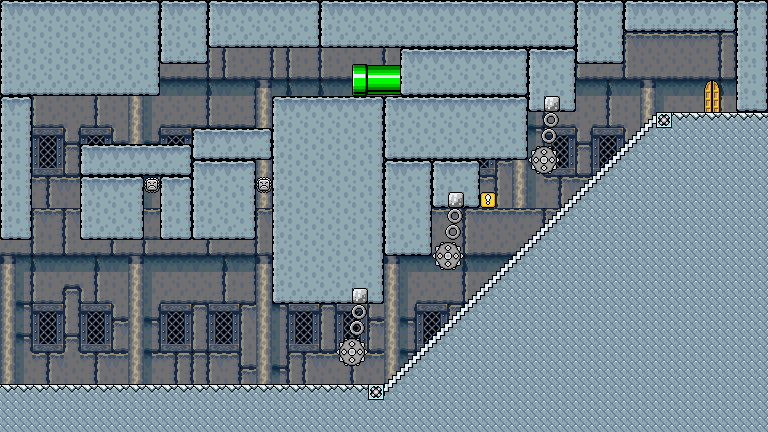
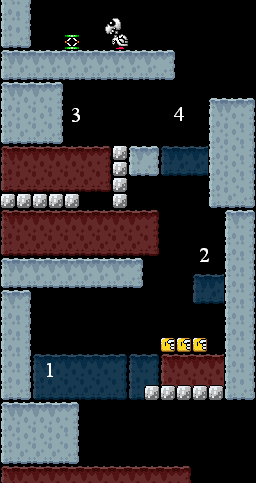
This is the first room of the stage. Mario enters the room at the bottom left. The first obstacle the player encounters is a pair of thwimps. This introduces the theme of the castle, which revolves around elements that the player must work around rather than influence. The thwimps jump back and forth between two set positions, never changing their pattern. They are also invincible to every attack. These enemies cannot be influenced in any way, but they will damage Mario upon contact. The player is at the whim of thwimps, and the best tactic is to get out of their way.
Two thwimps are used to ensure that this theme is established. Repetition--in moderation--makes sure the idea is clear. These two are enough to establish this theme, however; little would be gained from adding a third. Because this portion serves as an introduction, no other thwimps are needed.
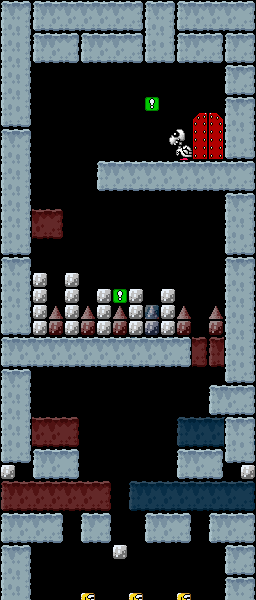
The next two sets of obstacles take this idea and modify it; they employ upward platforming and varied pacing. There are three ball Ĺn chains and three thwomps, each in separate areas. By including three obstacles of each kind, they pose a greater challenge than the thwimps. In addition, since there are three of each, they serve as parallels to one another.
In the first room, after the thwimps, the player encounters an upward escalator below three consecutive ball Ĺn chains. The ball Ĺn chains, much like the thwimps, move regardless of the player; they swing in a circle without stopping for anything. They are also invulnerable to every attack. So, they share the attributes that made the thwimps intimidating.
They build upon these attributes with the use of the escalator. Mario is constantly hauled upward, and if the player lets the escalator move Mario at its own pace, Mario is sure to collide with one of the ball Ĺn chains. So, not only does the player have no influence over the ball 'n chains, but the escalator takes things one step further by exerting influence over Mario.
Additionally, note that there is a yellow ! block just before the final ball 'n chain. This is an element of pacing that I liken to the bridge of a pop song.
The three ball 'n chains are A) harmful elements and B) beyond the player's influence. The yellow ! block A) is helpful because it contains a powerup mushroom and B) will only show up if the player has activated the yellow ! switch back in the first world. So, the yellow ! block strikes a note opposite to the three ball 'n chains.
Also note that this block appears just before the final ball 'n chain. Just as with the two thwimps earlier, two ball 'n chains establish a theme. The yellow ! block, then, comes along to contrast that theme. By providing a contrast, the player gains a greater appreciation for the ball 'n chains--it's easier to understand the significance of the ball 'n chains when you have an opposite to compare it against.
After this, one final ball 'n chain appears to restate the theme and bring the segment back to its core idea.
To review:
- A ball 'n chain introduces the idea of swinging spiked balls.
- A second ball 'n chain establishes this theme: this segment will be about this kind of encounter. (If this ball 'n chain was a different stage element, then the theme of this portion would be indeterminate at this point--you'd need to encounter more stage elements to get an idea of the theme.)
- A yellow ! block contrasts this theme by displaying attributes which oppose the spike balls; it is player dependent and helpful. Because it opposes the ball 'n chains in these ways, we can observe that the important part of the ball 'n chains must be that they are player independent and harmful.
- A final ball 'n chain restates the theme. The yellow ! block was a deviation, so this ball 'n chain brings focus back and recenters the whole segment.
That's introduce, establish, deviate, and restate. This is a common structure for many art forms, many games, and many platformers. In particular, the next room of this castle will use it.
Finally, the green pipe at the top leads to a bonus area and a shortcut. The level leads the player to the right, but going against this direction will reward the player. This concept is revisited in the third room of the level.
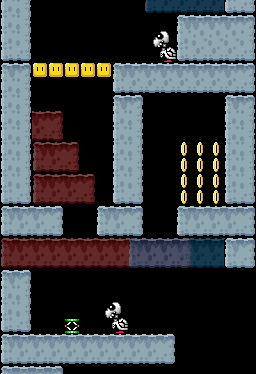
With the second room comes the second set of three obstacles: this time, thwomps. The playerĺs pace is defined at his or her will, since the floor in this room is motionless. This increase in control is matched by the choice of obstacle. Thwomps fall as Mario approaches--their movement is indirectly controlled by the player. However, thwomps cannot be harmed in any way by Mario. When facing a thwomp, only advantage the player can gain is the ability to avoid it. The player cannot triumph over a thwomp, but he/she can still influence it.
Let me put it another way. In the first room, the escalator actively brought Mario into danger. In the second room, the player may advance at his or her own pace, but Mario is certain to meet a thwomp no matter what that pace is.
The podobo is another bridge element. This time, it deviates from the thwomps by appearing at its own pace; the player holds no influence over it. In this way, the importance of the thwomps becomes the fact that they react to the player. Note that this is also how the thwomps deviate from the first room--no enemies in the first room would react to the player.
That said, the thwomps still intimidate because they cannot be killed.
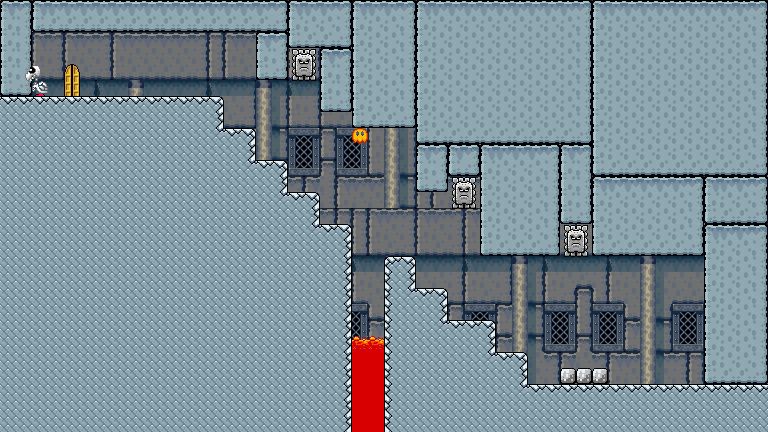
The dry bones right at the end of this room introduces the player to what Mario will face in the next room. This enemy is not difficult to avoid, but instead, acts to familiarize the player with how the stageĺs themes are explored in next room.
The first two rooms, then, establish a theme composed of two ideas. First, Marioĺs progression is more vertical than most stages; he always leaves a room much higher than when he entered. Travelling upward builds suspense; to go beyond game mechanics and speak on us humans in general, altitude and fear are good friends. This suspense is enhanced by the theme's second idea, stage elements which the player cannot influence. The theme of this stage is about intimidating enemies in the context of upward platforming, and the third room explores it further.
(In Super Mario Advance 2, there is a midway tape at the start of the third room. This is appropriate, given that the first two rooms establish their themes together, while the third room takes those themes and modifies them.)
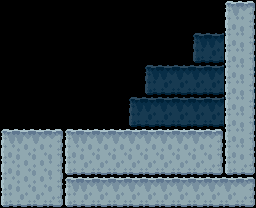
Layer 2 is often used to refer to shifting background elements in Super Mario World. Layer 2 is a plane which exists separately from normal stage elements. In the case of the third room, layer 2 contains a series of blocks that move side to side. This image is color-coded to show the different positions layer 2 will take in the room. When layer 2 has shifted all the way to the left, the blue blocks are as they appear in the image. When layer 2 has shifted all the way to the right, the blocks in red are as they appear in the image. If that doesnĺt make sense, this video will help.
Much like the conveyor belt of the first room, layer 2 determines the pace of the player. The player can only progress upward when blocks are placed just right. Much like the thwomps of the second room, the dry bones may be influenced by the player, but usually cannot be killed; a dry bones crumbles when Mario jumps on it, but after a short time, it will rise again. (A dry bones may be killed if a player has a cape or if the dry bones stands on a knockable block.)
That should be enough to convince you that the second half of the stage varies upon the themes of the first half. For the most part, this article is over.
But to conclude it here would ignore the complexity of construction in the third room. While the first two rooms are easy to pick apart, the third room contains much more nuance. In the first room of Mortonĺs castle, Mario travels to the right to move upward, and in the second room, Mario travels left to make upward progress. Similarly, the third room uses left and right movement to puncuate its segments. In other words, there is a rhythm of upward movement in how the third stage shifts back and forth between leftward and rightward movement.
The images below use the coloring scheme described above: the blue blocks move in from the right on layer 2, and the red blocks move in from the left on layer 2. In other words, the blue blocks are present when layer 2 has shifted all the way to the left, and the red blocks are present when layer 2 has shifted all the way to the right. It may help to consult this video as you read further.
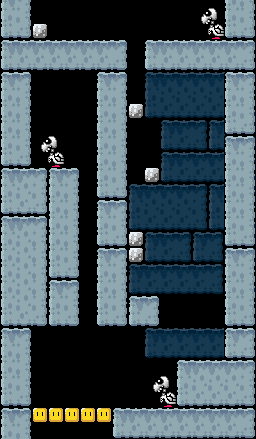
Mario enters the room at the bottom left. Simply enough, he must move to the right to move upward. Note that the room is much thinner than the previous two rooms. Because this room places larger emphasis on vertical movement than the previous rooms, horizontal space is restricted.
Then Mario travels to the left and up. On this trip, Mario makes less vertical progress than before.
From the end of the last segment, at point 1, Mario moves right to point 2, left to point 3, then right to point 4. First, note the three ? blocks; they act as a framing device to mark the beginning of the thematic center of the room (in other words, the room really starts after these blocks). There are three ? blocks higher up which signal the end of this thematic center. The use of ? blocks marks a contrast against most elements of the stage because theyĺre there to help the player at the player's whims. This makes them stand out and provide a clear marking point amidst the dangers of the stage.
Second, through this series of four steps, the room becomes more constricted and tight. This image should be seen as a sequence of three movements: right from point 1 to point 2, left to point 3, and right to point 4. In each subsequent movement, Mario makes less vertical and horizontal progress. The first two movements in the room (those shown in the first two images of this room) are wide and cover the width of the room, then these three movements grow gradually thinner and shorter. The first two movements of the room establish a pattern which these three movements complicate.
Next is a pause in the platforming to set up the continuation of the pattern. Just as the last three movements gave less horizontal progress over time, this movement forces the player to make sheer vertical progress up the red blocks. There is little horizontal progress; only half the horizontal space of the screen is used. In fact, Mario is blocked off from the right half of the screen by a divider in the middle. Mario, then, is forced to occupy a small, constricted space in order to proceed.
So, the back-and-forth right-and-left rhythm of this room will send the player leftward, towards the way upward to the next segment. However, to the right is a helpful coin cache. This bonus path deviates from the main path by its placement (being on the right when the rhythm leads the player leftward) and its content (containing coins rather than shifting blocks).
Mario progresses to the left because he enters this image from the right. Recall that point 4 on the last image is on the right side of the screen. Note that on the right is a dead end that rewards the player with coins.
The pause in platforming is the block at the bottom of the image on which the dry bones stands. This pause is required to set up the next segment. Since Mario is moving all the way from the right side of the screen over to the far left, he will need space to move. This also gives the player a chance to wait and set up the next move. A dry bones is placed to assure the player does not have an easy time doing this. If the player flattens the dry bones, it will remain harmless for a short period of time, so it is in the playerĺs best interest to get away from it as soon as possible. However, the player is forced to wait on this platform until he/she can get Mario through the opening above: the red blocks will prevent Marioĺs upward movement for a time. The dry bones, then, adds tension to the resting point. The player cannot rest at any point, and the player cannot subdue any element of this stage, even the enemies.
Thatĺs not entirely true. This room introduces subtle user defined aspects. Dry bones may be killed if the player possesses a cape, though thatĺs a rarity. Also, if the player has activated the green switch palace, the green ! blocks will appear to help at two points near the closing of the stage. The player may only kill dry bones in rare cases, and the green ! blocks provide help only twice. These aspects hardly let the player dominate the stageĺs construction, but they do provide relief along the way. Recall that the yellow ! block offered similar relief in the first room.
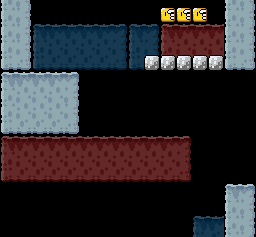
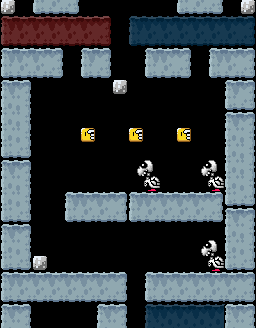
The trend continues. The bonus path this time requires more skill. The player must happen upon a beanstalk in one of the yellow blocks by chance, then climb up the thin passage and face a dry bones to find a hidden block containing a 1up. The reward is great, but so is the danger. It should be noted that it is also harder to find this bonus than the previous one; thereĺs no guarantee the player will find the beanstalk.
The series of yellow blocks also allows for a greater sense of user empowerment. Provided Mario never obtains a cape in this stage, this is the only chance the player will have to kill a dry bones. The player can kill it by hitting a yellow block while a dry bones is above. Note that this comes in the middle of the room, at its thematic peak. At the heart of the room, when Mario is at the greatest danger, the stage allows the player control over an enemy which normally canĺt be killed.
Shifting directions again, having reached the far left side of the room, Mario starts to the right. However, upward progress is made by jumps upward with as little horizontal progress as possible: Marioĺs environment becomes even more constricted and tight. At most, this section will be most two blocks wide when the blue blocks shift all the way in. In the tightest segments, Mario will be crushed to death when the blue blocks move all the way in. Note that, just like the last movement, this movement is marked by a series of three blocks: the three small blocks up against the divider in the middle of the screen. (The previous segment has three red blocks in sequence just below the yellow blocks.)
These continually more constricting spaces add to the loss of freedom; Mario has less and less space in which to move.
Why is Mario pushed up against the left half of this space? Iĺm not sure. My immediate reaction is to note that it allows for a bonus dead end path in the next image. In the next image, if Mario goes left, he may continue through the stage, but if he goes right, he will risk hitting a dry bones but will be rewarded with a 1up mushroom. Why is this bonus necessary to the stage, though? I donĺt know.
Having reached the top of the last image, the player is given another rest point. Itĺs a relief to be able to move so far left and right again. This concludes the two most constricted passages of the room.
The block on which two dry bones walk is separate from the lower resting point in order to stand out as part of another segment. The three ? blocks mark the end of the roomĺs core. To contrast the three earlier ? blocks, these are guarded by dry bones rather than shifting blocks. This emphasizes that the layer 2 portion of the stage isľ-for the most part-ľconcluded, while the player still has one large enemy left to fight: the boss, Morton.
This last image shows one last hurrah of the shifting layer 2 blocks. There is one movement to the right side of the screen (up over the two blue blocks at the bottom), providing a buildup to the real challenge: the movement to the left over a bed of shifting spikes. These jumps are far more precise than anything previous, and in fact, introduce an obstacle not yet seen: spikes. Itĺs here that the user defined green ! block provides assistance. Just as the player was able to kill the dry bones at the thematic peak of the stage, the player is able to provide platforming assistance for himself/herself during the most difficult moment of the stage.
A final dry bones guards the boss door, since there can be no moment of rest. A green ! block stands as a poignant moment of user defined help; the user is rewarded for a previous discovery just before the most challenging enemy of the stage.
The enemies and stage construction here all conspire to take freedom away from the player. Rarely can Mario influence the elements of Mortonĺs Castle, instilling a feeling of desperation and hopelessness befitting that of a castle. When he can influence enemies, such as thwomps and dry bones, they are persistent.
Mortonĺs Castle is predominantly vertical; even in the horizontal rooms, Mario works his way upward. Most castles and all fortresses in Super Mario World are horizontal. However, itĺs interesting to note that all fortresses in New Super Mario Bros. Wii are vertical upward stages.
Isn't there a boss?
The Morton boss fight is outside the scope of this article. In Super Mario World, bosses are arbitrary to the stage in which they reside, and Morton is no exception. This is not to say the bosses are entirely arbitrary; they maintain a sense of framing across the entire game. Iggy and Larry, the first and last koopaling bosses, are nearly identical; Larry proves more a challenging fight because his room contains podobos. Ludwig marks the height of the sequence in its middle; he is the fourth koopaling, and his fight is unique among the koopalings. In a sense, his fight is the centerpiece of the game. Morton and Roy, the second and fifth koopalings respectively, resemble each other. Roy is made more challenging, as the walls close in during the fight, threatening to crush Mario. Lemmy and Wendy, the third and sixth koopalings, also resemble each other, though Wendyĺs is more challenging because of the two podobos she keeps around. In other words, if you assign the same letter to two koopalings that are similar, you end up with this pattern:
- A (Iggy)
- B (Morton)
- C (Lemmy)
- D (Ludwig)
- B (Roy)
- C (Wendy)
- A (Larry)
The sequence B, C appears twice in there--let's group them.
- A (Iggy)
- BC (Morton then Lemmy)
- D (Ludwig)
- BC (Roy then Wendy)
- A (Larry)
comments powered by Disqus
All original content on VG Thought was written by Greg Livingston AKA Golem.